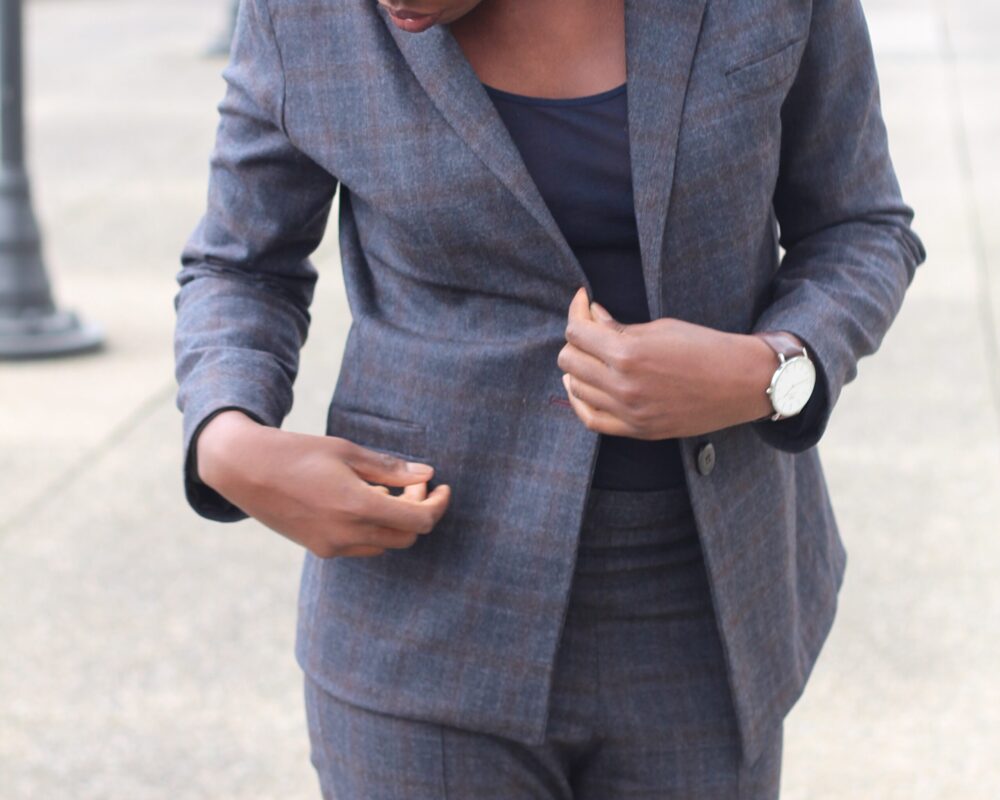
Ce projet, est je pense le défi de l’année. UN TAILLEUR!
Et pourtant lorsque RDC a sorti sa collection AH 2015-2016 la veste Françoise ne me disait pas grand chose. C’est au fur et à mesure du temps que j’ai commencé à avoir un grand faible pour le style tailleur adopté notamment par Christine and the Queens. Porté en style garçonne pour un look assez smart ou en style décontracté avec une paire de Stan Smith. Toujours avec un T-shirt en coton en dessous (pour éviter le côté super Nani avec une chemise), ce look me plait tant par sa simplicité que par le style qu’il apporte. Alors en bonne couturière amatrice il fallait maintenant CHERCHER UN PATRON! Mais pas n’importe lequel! Un Patron qui me fournirait tout pleins d’explications avec des dessins pour comprendre ce col. Donc sans hesiter, je me suis tournée vers la veste Françoise de RDC.
Après avoir soigneusement choisi un tissu (ici un 100% laine qui s’apparente à de la flanelle), j’ai pris tout mon temps pour réaliser cet ensemble, en allant vraiment petit à petit.


Mes impressions et feedback…
– Un patron très bien expliqué dans le livret, en plus du pas à pas disponible en ligne.
– En étant serrée au niveau des épaules sur une des chemises Johanna que j’ai réalisé en T.36 (j’ai les épaules un peu larges) , Je n’ai pas hésité à couper ma veste en T.38.
– Pour avoir un résultat nickel chrome, repasser Après CHAQUE COUTURE!
– La patte de boutonnage avant: j’ai lu sur les réseaux sociaux que les personnes ayant réalisé le modèle ne pouvaient pas fermer la veste avec un double boutonnage comme dans le modele initial. Ceci ne me causait pas de problème car à la base je voulais vraiment une veste d’homme. Donc pour une fois, pas de fantaisie!
– Je n’ai pas hésité à lire sur le net les techniques de préparation de tissu pour un tailleur et j’en ai appris des choses! Par exemple l’utilisation d’une cigarette pour la finition des manches.
– Misez sur un tissu de bonne qualité, car passer beaucoup de temps pour un résultat pas à la hauteur de votre travail, ce n’est pas top.
– Faites aussi attention Au choix du thermocollant. Choisissez un qui soit adapté à votre tissu. J’ai utilisé celui-ci adapté à la couture de vestes, tailleurs et manteau. J’aime beaucoup ce thermocollant.
Pour le pantalon, j’ai simplement utilisé un patron Burda (que je n’utiliserai plus jamais d’ailleurs!). Je l’ai coupé un peu trop court au niveau des pieds et ait dû faire de nombreux ajustements.
Voila pour ma veste Françoise. J’espère que ce patron ainsi que la réalisation que j’en ai faite vous ont plus.
This is definitely the challenge of the year! Sewing a suit!
When RDC edited this pattern for the AW 2015-2016 edition I was not that attracted to the Françoise pattern. However as time went by I was getting more and more interested in this style that could be worn chic as well as casual chic. Pairing it with a pair of derbies for a smart look, and with a pair of Stan Smith for a chic street style. And as simple as this look promises to be, you can wear it with a simple Tshirt underneath.
So as a sewer I just decided to find a pattern for this, but a pattern with a step by step explanation. Françoise Pattern was the one.
I found this Hermes fabric at sacrées coupons in Paris, and just grabbed it because: the final results also depends on the quality of fabric that is used.
My impressions and feedback…
– A Very well explained pattern. If you do not get it, follow the step by step pictures on the website.
– I felt a bit tight at my shoulders using a previous Shirt pattern with size 36 because i have wide shoulders, so I just went for size 38 and I’m glad I did (don’t want to feel tight in this after all this work!)
– For a perfect result iron at EVERY SINGLE STEP.
– The original pattern has two rows of boutons at the front. I have read many people complaining about the fact that they are not able to close the front with the two button rows. This was not that big of an issue for me as I initially did not plan to add this double row. I wanted a masculine style all together.
– I also took time to read on Internet for a few techniques of tailoring. Very interesting!
– Use an appropriate interfacing fabric. I used this one suitable for jersey and wool fabrics.
The pants pattern is A classic Burda pattern. Will not bebralking that much about it here as i have the impressions that there are a few mistakes on this Burda pattern.
That is it for the post of the day. I hope you liked it and found the recommendations useful.


Bravo!! super joli ton tailleur, la veste serait aussi bien portée avec une jupe.
Félicitations
Cette tenue est canon! J’adore!
Merci beaucoup lili 🙂 je regrette juste la longueur et la forme au bout du pantalon mais je vais essayer d’y remédier.
Mais oui carrément avec une jupe!!! C’est vrai que le champs des possibles deviens vite vaste!en tout cas merci pour cette idée.
J’aime j’aime j’aime!
Superbes : la coupe, le choix du tissu, la réalisation… Et je sais que le pantalon ne te plait pas, mais il a beaucoup de style je trouve ! Je suis contente que l’article sur la cigarette t’ait servi !
Très chouette! Bravo le rendu fait tres pro!
Ton ensemble est réussi, c’est dommage que ton pantalon te plaise moin.
Une réussite, comme d’habitude! Tu m’impressionnes et quel style!!!!! Continue!
It looks fantastic! Very Thom Browne/Paul Smith. 🙂
Oh wow What an honor. I’m in love with the suit style. Thank you dear.
Ahh c’est vraiment gentil ☺️ merci beaucoup en tout cas. Ça m’encourage :)) . Bises
Coucou Pascale, merci beaucoup. Je vais refaire le bas du pantalon ce week-end gratter au maximum de la marge dans l’ourlet.
Merci beaucoup bobines et babines. La qualité du tissu joue pour vraiment beaucoup sur le rendu final.
Ouiiii merci encore. C’est vraiment gentil. Ce week-end je vais essayer de rallonger le bas en prenant dans l’ourlet on va voir. Haha.
Merci merci merci!!! 💕💕💕
Très bel ensemble !! Joli tissu !!! Et jolie veste !!! Un style moderne chic très sympa 😀
Merci beaucoup Alexandra c’est vraiment très gentil ☺️
[…] que je me suis d’abord essayé à la veste Françoise de RDC que j’ai réalisé ici en ensemble tailleur. Je savais qu’en la réalisant je comprendrais mieux la logique de […]